PDF-Meta-Daten ändern
Gib in der App „Terminal“ ![]() auf deinem Mac die folgenden Befehle ein, um die Meta-Daten eines .PDF zu ändern. Ggf vorher das .PDF reparieren:
auf deinem Mac die folgenden Befehle ein, um die Meta-Daten eines .PDF zu ändern. Ggf vorher das .PDF reparieren:
brew install exiftool
brew install ghostscript

gs -o repaired.pdf -sDEVICE=pdfwrite -dPDFSETTINGS=/prepress /Users/a/Desktop/BROKEN.pdf

exiftool -PDF:CreateDate="2025:09:22 10:11:17" repaired.pdf
exiftool -PDF:ModifyDate="2025:09:22 10:11:17" repaired.pdf
exiftool -Title="Mein neuer PDF-Titel" -overwrite_original /Users/a/Desktop/repaired.pdf

PRÜFEN:
exiftool /Users/a/repaired.pdf | grep Title
Keine Zeitpläne mehr in Sonoma – pmset
Gib in der App „Terminal“ ![]() auf deinem Mac den Befehl
auf deinem Mac den Befehl pmset ein. Eine Liste der Befehle, die du verwenden kannst, findest du auf der pmset man-Seite. Führe zum Beispiel könntest du folgendes ausprobieren:
pmset -g sched: Siehe dir den aktuellen Zeitplan an.sudo pmset repeat wake M 8:00:00: Stelle deinen Mac so ein, dass er jeden Montag um 8:00 Uhr den Ruhezustand beendet.sudo pmset repeat cancel: Lösche den aktuellen Zeitplan.
Drücke den Zeilenschalter. Um zu sehen, welche Schedules aktiv sind:
x@iMac24i2021-User ~ % pmset -g sched
Repeating power events:
  wakepoweron at 9:55PM every day
  shutdown at 0:00AM every day
Um auch die folgenden Einträge zu entfernen:
Scheduled power events:
[0] wake at 11/28/2024 17:16:40 by 'com.bombich.ccchelper'
[1] wake at 11/28/2024 23:03:01 by 'com.apple.alarm.user-invisible-com.apple.acmd.alarm'
«sudo pmset sched cancelall» und danach folgenden Befehl anwenden:
«sudo chflags schg /Library/Preferences/SystemConfiguration/com.apple.AutoWake.plist»
TIPP: use ONYX for a GUI 😉
Mit netcat zB STARTSSL beim SMTP-Server testen:
nc -C smtp.securehost.de 25
EHLO expanic.com
CCC less restrictive for non-admin users
Modifying CCC’s Security Configuration:
Those instructions indicate how to make the CCC privilege more restricted. If you want to make it less restricted, run these commands in the Terminal instead. The non-admin user should then be able to run CCC tasks without additional authorization.
Folgenden Befehl in der App „Terminal“ auf dem Mac eingeben:
security authorizationdb read com.bombich.ccc.helper > /tmp/ccc.plist
defaults write /tmp/ccc "authenticate-user" -bool NO
defaults write /tmp/ccc "session-owner" -bool YES
plutil -convert xml1 /tmp/ccc.plist
security authorizationdb write com.bombich.ccc.helper < /tmp/ccc.plist
security authorize -ud com.bombich.ccc.helper
macOS Version einer externen SSD feststellen
Folgenden Befehl in der App „Terminal“ auf dem Mac eingeben:
cat /System/Library/CoreServices/SystemVersion.plist

Erstellungs-Datum et cetera für eine Datei ändern:
Folgenden Befehl in der App „Terminal“ auf dem Mac eingeben:
SetFile -d '7/31/2019 19:48:17' /PFAD/zur/Datei.pdf
Anmerkung: Um das Änderungsdatum zu ändern, einfach SetFile -m verwenden.
Laufende Prozesse/Scripte in macOS anzeigen lassen:
Gib den folgenden Befehl in der App „Terminal“ auf dem Mac ein:
ps aux
oder
pgrep -lf .
Anmerkung: Hier werden nur die PIDs und Namen angezeigt.
top -o +state
Anmerkung: Zeigt alle Prozesse und deren aktuellen Status (running, sleeping, stuck > hilfreich beim Troubleshooten von Scripten).
OPTIONEN: top -o rsize oder top -o cpu
NOTA BENE: Falls mehr Informationen nötig sind, einfach htop oder pstree via Homebrew installieren. Der Befehl lsof als auch der „Aktivitätsmonitor“ sind immer hilfreich 😉
Bestimmte Partitionen/APFS-Volumes im Finder unsichtbar machen
Gib den folgenden Befehl in der App „Terminal“ auf dem Mac ein:
sudo chflags hidden "/Volumes/Drive Name/"
killall Finder
Anmerkung: Funktioniert gut bei Partitionen oder APFS-Volumes ohne ein macOS installiert. Für Laufwerke mit Betriebssystem folgenden Befehl verwenden:
sudo SetFile -a V /Volumes/"Drive Name"
Note: Install command line developer tools if you’re prompted to do that.
The lower-case “v” in this command as opposed to the upper-case in the hiding command. This is the attribute controlled by “-a”; “V” means “invisible,” and “v” means “visible.”
How to prevent partitions from mounting when you boot up, log in, or connect drives to your Mac
1) To prevent partitions from mounting automatically we are going to add their UUIDs to a list via Terminal. First, connect the drives and mount the partitions which you do not want to mount automatically in future.
2) Next, launch Terminal (found in /Applications/Utilities, or with Spotlight). At the prompt, paste the command:
diskutil info /Volumes/"Volume Name" | grep 'Volume UUID'
Replace “Volume Name” with the name of the partition you want to stop from mounting, making sure to retain the speech marks if your volume name contains spaces or punctuation.
It will return a string titled “Volume UUID”.
3) Copy this long string and paste it somewhere, then repeat the command for all the other partition names you want, pasting their UUIDs somewhere safe too.
4) Once this is done, in Terminal, type:
sudo vifs
5) Enter your administrator password when prompted. An empty editable document will then appear in the Terminal window. Press the “A” key to bring up the cursor and, using the “Down Arrow” key and a final press of the “Enter” key, navigate down the document to below the lines marked with the # symbol, and above the lines marked with the ~ symbol.
Now copy and paste the following line into the document:
UUID=XXXXXXXX-XXXX-XXXX-XXXX-XXXXXXXXXXXX none hfs rw,noauto
6) When you’ve finished, press the “esc” key to exit cursor mode, then type “:x” and hit the “Enter” key to save your changes and exit the document.
After a reboot, logout/login, or disconnect/reconnect of the drives, the partitions you have added to the document should not automatically mount. If you wish to mount those partitions in future, you can use Disk Utility or Terminal to do it manually.
In order to reverse the changes described here you can remove the UUIDs of your drives from the /etc/fstab file which we added them to, using a similar process as before. First, open Terminal and issue the “sudo vifs” command. Enter your password to view /etc/fstab with your list of drives inside. Press “A” to enter edit mode, navigate down to your inserted lines with the “Down Arrow” key, and use the “Delete” or “Backspace” key to remove as many of them as you like. When finished, press “esc” to leave edit mode, then type “:x” and press the “Enter” key to save changes and exit the editor.
This method will work with normal, RAID, encrypted and CoreStorage partitions. The command given in this guide assumes the partition in question is formatted jhfs+ (Mac OS Extended Journaled), and that you wish it to be read-write on mount. Most macOS partitions are formatted in this way, but you can check the formatting of your drive in the Disk Utility application if you are unsure. If your partitions are set up differently, you must edit the command accordingly.
For example, if you did want the partition to mount automatically, but wanted it to be mounted as read-only instead of read-write, you could remove the phrase “noauto”, and replace “rw” with “ro”.
To set a partition that is formatted as FAT to not automatically mount, replace “hfs” in the above command with “msdos”.
Other file type commands are available, look up the ones you need if they are not mentioned here. I have verified this guide as working from OS X 10.7 – macOS 10.12.
As a final note, many guides suggest using this command to edit the file:
sudo nano /etc/fstab
Although I have used this command myself and it works well, it is not recommended by Apple as completely safe. As detailed, Apple recommends always using the “vifs” tool instead.
Please let me know if you found this useful below, or if you have any questions or problems regarding the process. Happy mounting!
Lokalen Computer neu starten aka reboot
Gib den folgenden Befehl in der App „Terminal“ ![]() auf dem Mac ein:
auf dem Mac ein:%
sudo shutdown -r nowEntfernten Computer sofort neu starten
- Gib die folgenden Befehle in der App „Terminal“
 auf dem Mac ein:
%ssh -l admincomputer% sudo shutdown -r now
Ersetze admin durch den Kurznamen eines Benutzeraccounts auf dem entfernten Computer.Ersetze computer durch die IP-Adresse oder den Hostnamen des entfernten Computers.
Entfernten Computer zu einer bestimmten Zeit neu starten
- Gib die folgenden Befehle in der App „Terminal“ auf dem Mac ein:
%ssh -l admin computer% sudo shutdown -r hhmm
Ersetze admin durch den Kurznamen eines Benutzeraccounts auf dem entfernten Computer.Ersetze computer durch die IP-Adresse oder den Hostnamen des entfernten Computers.Ersetze hhmm durch die Stunde und Minute, zu der du den entfernten Computer neu starten möchtest.
Nach Stromausfall automatisch neu starten
- Gib den folgenden Befehl in der App „Terminal“ auf dem Mac ein:
%sudo systemsetup -setwaitforstartupafterpowerfailure seconds
Ersetze seconds durch die Anzahl der Sekunden, die verstreichen sollen, bevor der Computer nach einem Stromausfall gestartet wird. Dieser Wert muss 0 (Null) oder ein Vielfaches von 30 sein.
Hinweis: Du kannst auch in der Systemeinstellung „Energie sparen“ festlegen, dass der Mac nach einem Stromausfall automatisch gestartet werden soll.
Wie kann ich via SSH ARD aktivieren für alle User?
sudo /System/Library/CoreServices/RemoteManagement/ARDAgent.app/Contents/Resources/kickstart -configure -allowAccessFor -allUsers -privs -allWie kann ich via SSH ARD aktivieren für User X?
sudo /System/Library/CoreServices/RemoteManagement/ARDAgent.app/Contents/Resources/kickstart -activate -configure -access -on -users x -privs -all -restart -agent -menuWie kann ich meinen Mac über den Terminal neustarten?
sudo shutdown -r nowWelcher Prozessor ist im Mac eingebaut?
iMac24iSSD-mid2007:~ x$ sysctl -a | grep brand
machdep.cpu.brand_string: Intel(R) Core(TM)2 Duo CPU T7700 @ 2.40GHz
machdep.cpu.brand: 0
Monitor Progress of du or copy Command
In Linux, while copying files from one location to other using cp command, the progress of data is not shown, to see the progress of data being copied, you can use the watch command along with du -s command to check the disk usage in real time.
# cp ubuntu-15.10-desktop-amd64.iso /home/tecmint/ &
# watch -n 0.1 du -s /home/tecmint/ubuntu-15.10-desktop-amd64.iso

Kennwort-Richtlinien löschen
pwpolicy -clearaccountpolicies
Re-run mac OS Setup-Assistant
sudo rm /var/db/.AppleSetupDone
OWC Aura Pro X2 SSD in MacBookPro 13i *2015 > fix crash on sleep issue
Drive type: NVMe SSDs running macOS 10.13 or later (as boot volumes)
sudo pmset -a standby 0
https://eshop.macsales.com/Service/Knowledgebase/Article/26/785/NVMe-SSDs-Standby-Mode-Issue
TimeMachine Backups > um festzustellen, was sich beim Backup ändert (!), gleich geblieben ist (-) und dazugekommen ist (+):
tmutil compare -s

Disable Boot on Lid Open / Power Connection on MacBook Pro (2016+)
- Open the Terminal, which is found in /Applications/Utilities/, and then enter the following command syntax exactly:
sudo nvram AutoBoot=%00- Hit return and authenticate with the admin password (necessary due to sudo)
- Exit Terminal when finished
With AutoBoot turned off, when the MacBook Pro lid is opened, it will no longer boot the computer or turn the computer on simply by opening the lid. Additionally, connecting the power cable will not automatically boot the Mac. Instead, the behavior is like it was on earlier Macs, which can open the lid of a Mac without turning the computer itself on.
Return to Default Setting of Booting on Lid Open with MacBook Pro
To return to the new default setting of booting automatically when the lid opens or when the power is connected, return to the command line and issue the following command syntax:
sudo nvram AutoBoot=%03
Hitting return and authenticating will complete the change. You can also reset Mac NVRAM to return the setting to default.
If you’re not sure what setting is enabled, using “nvram -p” will print the nvram settings that have been or can be configured.
This is a handy tip similar to adjusting whether or not the new MacBook Pro makes a boot sound effect or not. Thanks to a thread on MacRumors forums for the appropriate AutoBoot syntax.
How to See All Third Party Kernel Extensions in Mac OS X
The full syntax to see third party kernel extensions is as follows:
kextstat | grep -v com.apple
If Terminal says that permissions reset failed
When following the previous steps, if you get a message that permissions reset on user home directory failed (error -69841), follow these steps.
If your Mac is using macOS Mojave
- Quit Terminal.
- Choose Apple menu > System Preferences, click Security & Privacy, then click Privacy.
- Click the lock , then enter your administrator password.
- From the list of items on the left, select Full Disk Access.
- Add Terminal to the apps allowed full-disk access: Either use the add button , or just drag the Terminal app into the space above it.
- Open Terminal, then enter
chflags -R nouchg ~. - Enter
diskutil resetUserPermissions / `id -u`again. - When the process completes, restart your Mac.
- Choose Apple menu > System Preferences, click Security & Privacy, then click Privacy.
- Click the lock , then enter your administrator password.
- From the list of items on the left, select Full Disk Access.
- You can now remove Terminal from the apps allowed full-disk access, or just deselect the checkbox next to Terminal.
Passwort-Richtlinie ändern (Mojave):
pwpolicy -clearaccountpolicies
Optionen:
pwpolicy -u user -getpolicy
pwpolicy -u user -clearaccountpolicies
Hide a user account in the macOS login window
1. Log in as an admin user.
2. Use this Terminal command. Substitute the short name of the user that you want to hide for «hiddenuser»:
sudo dscl . create /Users/hiddenuser IsHidden 1
The user account is also hidden in System Preferences the next time it’s opened. This command can’t be used with the Guest user account. Learn how to manage the Guest user account.
If you want, you can delete the IsHidden attribute instead.
Hide the home directory and share point
You can move the hidden user’s home directory to a place that’s not visible from the Finder. And you can remove the hidden user’s Public Folder share point.
This command moves the home directory of «hiddenuser» to /var, a hidden directory:
sudo mv /Users/hiddenuser /var/hiddenuser
This command updates the user record of «hiddenuser» with the new home directory path in /var:
sudo dscl . create /Users/hiddenuser NFSHomeDirectory /var/hiddenuser
This command removes the Public Folder share point for the user with the long name «Hidden User”:
sudo dscl . delete "/SharePoints/Hidden User's Public Folder"
Anmeldebildschirm: Anzeigen von «Andere …» oder «Other …»
sudo defaults write /Library/Preferences/com.apple.loginwindow SHOWOTHERUSERS_MANAGED -bool TRUE
Show a hidden user account
If you want to show the hidden user, set the user’s IsHidden attribute to 0:
sudo dscl . create /Users/hiddenuser IsHidden 0
!/bin/bash
if [ $1 == ’ns‘ ]; then
while true; do
echo Enter a domain:
read domain
echo «»
dig ns $domain +short
echo «»
done
elif [ $1 == ‚mx‘ ]; then
while true; do
echo Enter a domain:
read domain
echo «»
dig mx $domain +short
echo «»
done
elif [ $1 == ‚whois‘ ]; then
while true; do
echo Enter a domain:
read domain
echo «»
whois $domain
done
fi
Crontab editieren für Zugriffsrechte
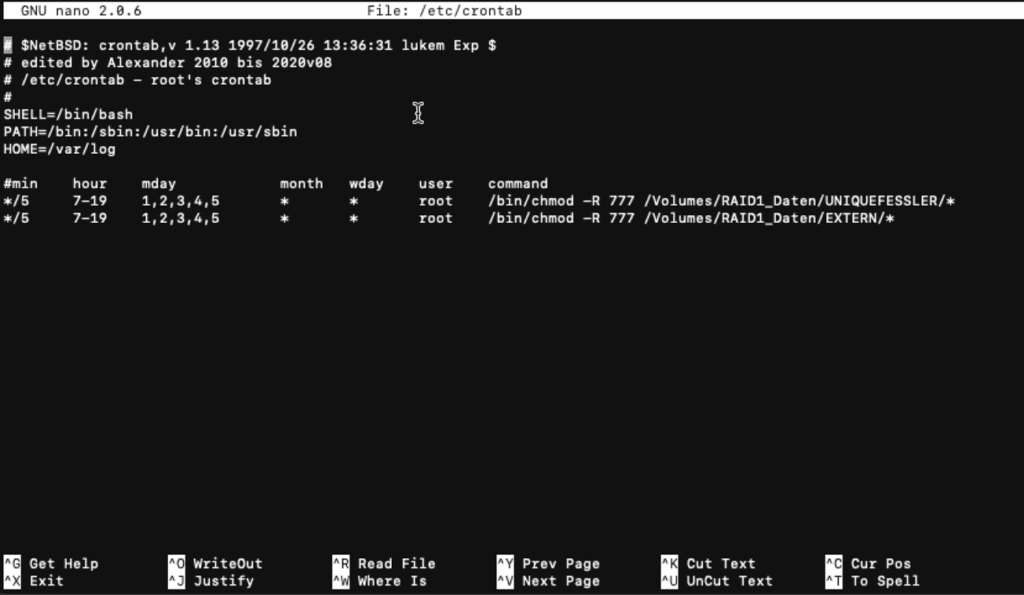
server:~ adminCOMPANY$ sudo pico /etc/crontab
GNU nano 2.0.6 File: /etc/crontab Modified
$NetBSD: crontab,v 1.13 1997/10/26 13:36:31 lukem Exp $
edited by Alexander 2010 bis 2020v08
/etc/crontab - root's crontab
#
SHELL=/bin/bash
PATH=/bin:/sbin:/usr/bin:/usr/sbin
HOME=/var/log
min hour mday month wday user command
*/5 7-19 1,2,3,4,5 * * root /bin/chmod -R 777 /Volumes/RAID1_Daten/ORDNERNAME/*
*/5 7-19 1,2,3,4,5 * * root /bin/chmod -R 777 /Volumes/RAID1_Daten/FOLDERNAME/*
Comments by wp-admin